If you notice large patches of dead grass, areas where the grass is thin or not growing at all or if you have large areas of grass that have been overrun with weeds; it might be time to install new sod. We would recommend attempting to seed small, thinning areas but planting pieces of new sod for larger applications. Installing new sod is a very simple process as long as you have taken the time to prepare the new area properly. The installation can be a bit labor intensive, so you might consider hiring a local landscaping company to do the sod installation for you. Professional sod installation costs range between $0.50 – $1.50 per square foot. When planning to install new sod, you should take accurate measurements for the correct square footage needed. If you have odd shaped-areas, you will want to measure the whole area as a rectangle or a square. Add an additional 5 percent to your final measurement to account for the waste in cutting edge pieces.
Choosing the Correct Sod
The first thing to consider is the type of sod you want to plant. In order to make the best selection, you will need to understand the sunlight requirement for your lawn. The most common warm-season grasses in the North Texas are: Bermuda, St. Augustine and Zoysia. Warm season grasses will grow between the months of March and November, going dormant and brown during the winter months. Most residential neighborhoods install Bermuda grass. Bermuda is a thin-blade grass and is most appropriate for full sun areas as it has very little tolerance for shade. St. Augustine is a much wider-blade grass that also enjoys full sun but has the highest shade tolerance. St. Augustine is considered a bit more invasive than the other warm season grasses so it may not be permitted by your HOA. St. Augustine is more commonly planted in the southern part of Texas. Zoysia is slowly becoming the sod of choice in our area as it offers the most variety. Zoysia is available in both wide and thin-blade and has more shade tolerance than Bermuda.
Preparing for Sod
Before installing new sod, the soil in the installation area will need to be properly prepared. First, identify any sprinkler heads in the installation area so they are not damaged during the installation or covered up by the new sod.
Next, if the installation area has existing sod, it will need to be removed. Professional installers can use a sod remover to speed this process up. If you are doing it on your own, we recommend using a square shovel to pierce the sod, carving out a square shape. Once pierced, use the shovel to lift the sod free from the soil. Once the sod has been removed from the installation area, this is a great time to address any weeds in the installation area. Take the time to apply any weed control products to the installation area being careful to follow all manufacturers’ instructions. Depending on the product you have used to eliminate the weeds, you may need to wait 24 hours before planting sod.
The soil in all installation areas will need to be loose to encourage the sod to take root. You can do this by adding new soil and raking it over the installation area. We recommend installing at least 1 inch of soil. Adding new soil might be especially necessary if you are also trying to re-grade the area to combat drainage and run-off. Another way to loosen the soil would be to till the soil in the installation area. Professional installers will bring a tiller to do this work. You can till the area yourself by renting a tilling machine or using a strong, metal rake to loosen the existing soil. Once loosened, mist the loosened soil with water.

Installing New Sod
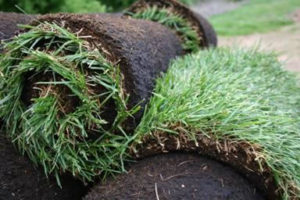
New sod should be installed within 24 hours of being cut on the sod farm. It’s best to begin your installation in a corner. The sod should be placed directly on top of the soil and pushed firmly in place and tamped down with your hand to make sure the sod has direct contact with the soil and there are no wrinkles. Place your next piece directly to the left or right of the first piece and continue until you come to the end of the first row. You want to place your sod right up against the neighboring piece with no gaps.
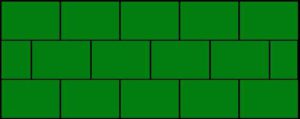
When you begin a new row, you will want to alternate the pieces in a brick fashion (see below). This allows for a tight fit and combats drainage and runoff between the pieces. To custom cut your sod pieces to fit your edges or around trees, simply use a squared shoved to pierce the sod and continue until you have created the correctly sized piece. Once you have completed your installation, immediately water the new sod and either tamp it down or roll it will a weighted sod roller.

Water Your New Sod
New sod takes approximately 3 weeks to take root. The best way to encourage proper rooting is to make sure your new sod stays consistently moist during the first 2 weeks. Plan to run your sprinkler system once in the morning before the sun comes out and again in the evening if you find that it has dried out. Your system can be set for shorter intervals than a typical weekly watering, approximately 10 minutes. Be on the lookout for areas that your sprinkler system may not be reaching and plan to hand water these areas. Water according to this schedule for the first 2 weeks. During the 3rd week, you can water every other day. Three weeks after installation, you should be safe to assume your normal weekly watering schedule.
Other Useful Information
Avoid mowing your new sod for the first 3 weeks while it is establishing its root system. In addition, do not apply any fertilization or weed control applications for between 4-6 weeks.


